

-
Pros
- Clear interface
- Best-in-class noise reduction
- Excellent autocorrection based on camera and lens characteristics
- Geometry corrections
- Powerful local adjustments
- Doesn't require importing
-
Cons
- Few workflow or photo organization tools
- No AVIF, HDR, HEIF, or JXL support
DxO PhotoLab Specs
| Content-Aware Edits | |
| Keyword Tagging | |
| Lens Profile Corrections |
DxO has long been among the most dynamic photo editing software makers. DxO PhotoLab, now in version 8, continues the company's tradition of giving photographers automatic lens- and camera-based image correction, superb noise reduction, and other innovative image tools. The software incorporates Nik U Point selection technology for some excellent local adjustments, too. DxO PhotoLab deserves a place in every serious shooter's digital photography toolbox, and it earns our Editors' Choice award alongside Adobe Lightroom Classic and Adobe Lightroom, both of which have stronger workflow features. Meanwhile, if you intend to do intense image editing and want all the latest technology, Adobe Photoshop is the way to go.
How Much Does DxO PhotoLab Cost?
DxO PhotoLab doesn't require a subscription the way Adobe's software does—you pay once and own the software until you need to upgrade it. The DxO PhotoLab Essential edition costs $139 and lacks some newer and more powerful features. The full-featured Elite edition (the version I tested for this review) goes for $229. Upgrading from version 6 or 7 costs $109. You can install the Elite edition on up to three computers; like Adobe's software, the Essentials version is installable only on two computers.
It's difficult to directly compare the price with the market leaders in photo editing software, Lightroom and Photoshop. Those are subscription-based and cost $9.99 per month at a minimum. So, with two years of use, the Adobe software costs more. However, Adobe subscriptions let you get your hands on new features as soon as they're available. With DxO, you have to buy an upgrade if you want the new features in the annual releases.
What's New in DxO PhotoLab 8?
The list of new features isn't huge, but the company has added some truly appealing new functionality. Here's the rundown:
DeepPrime XD2s: Most releases of PhotoLab include updated noise reduction, and version 8 is no exception. At this point, the improvements are incremental to an already excellent automatic noise reducer that maintains image detail.
Preview Loupe: This new tool is accessible from the top toolbar in Customize mode. It shows a nicely sized rectangle rather than Adobe's small round loupe. In its window, you see the result of all edits, including DxO's sophisticated noise reduction (more on that below).
Luma Tone Curves: This new and unique option for tone-curve editing lets you change tones without changing color saturation. The tool also now lets you drag a Tone Picker on a part of an image to adjust the tone under the cursor.
Hue Masks: Have you ever wanted to pump up the colors of just certain similar-colored objects in a photo? This new tool lets you target color enhancements for a specified range of hues.
Improved Lens Softness Correction: DxO leverages its large catalog of lens testing to deliver corrections based on specific lens models. According to the company, "new exclusive lens softness algorithms reveal detail without adding fringing artifacts in high-frequency areas."
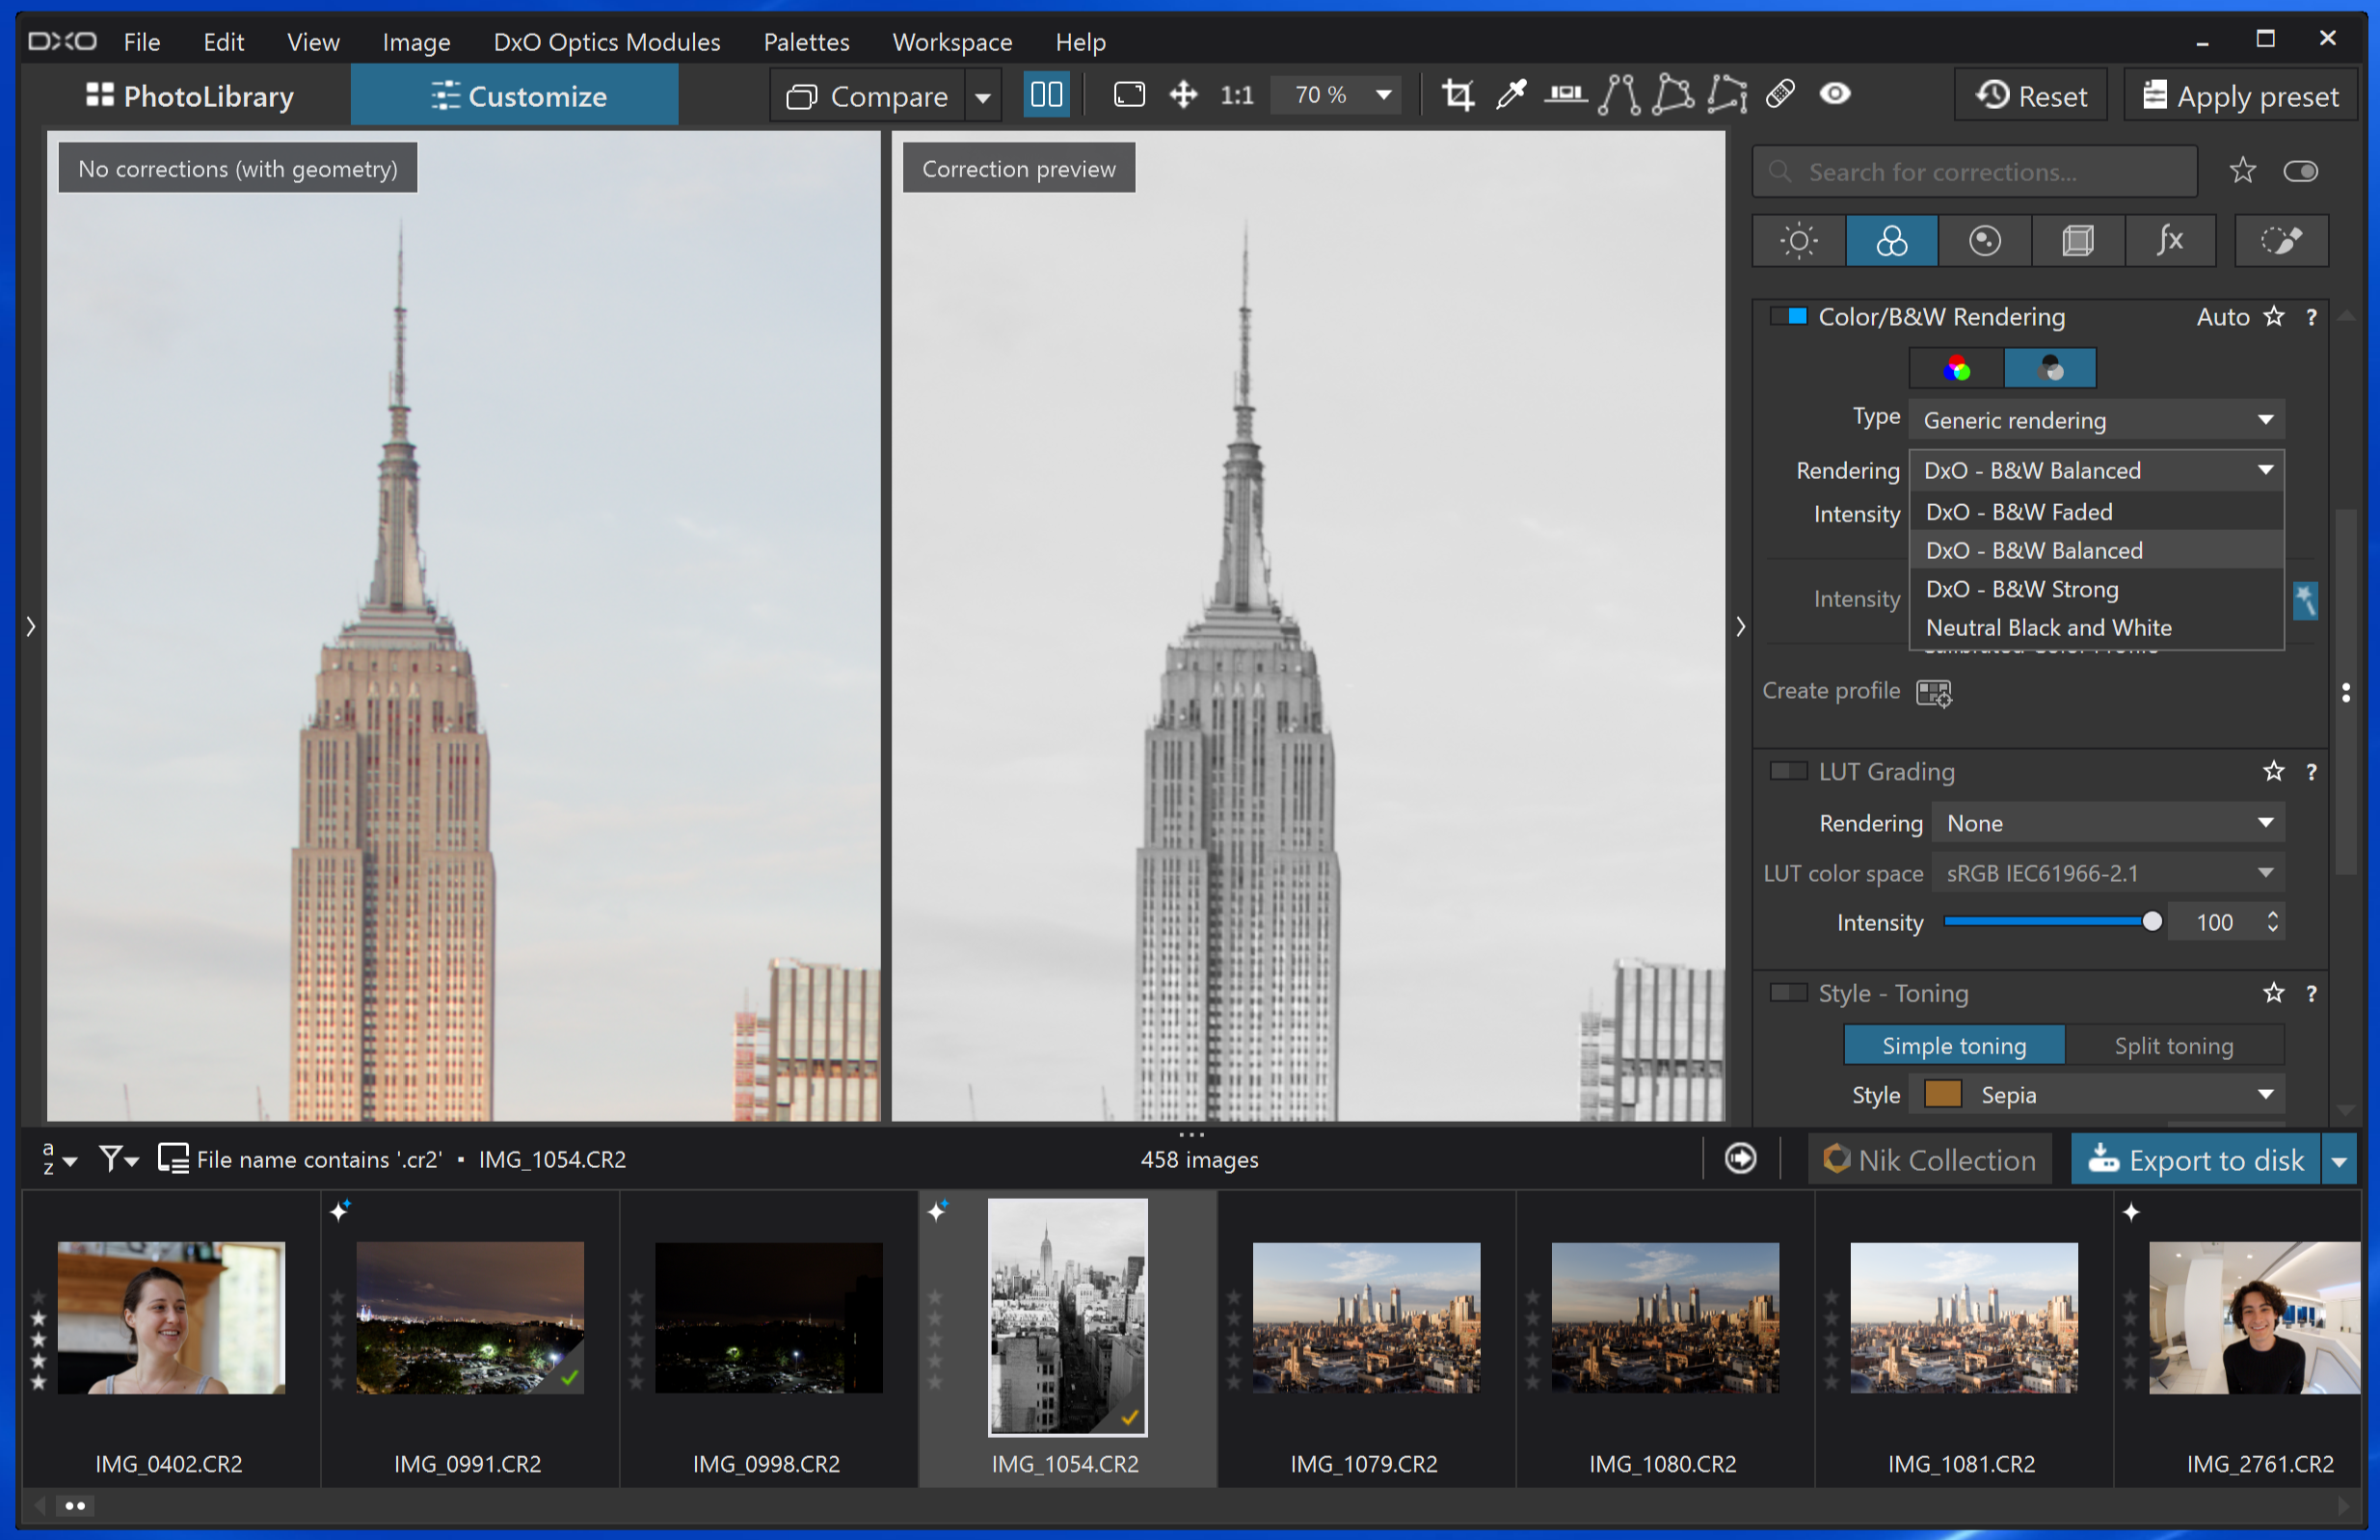
Compare Mode: This new feature lets you set a reference image for comparing edits. Also new: Rolling the mouse over a color rendering or LUT dropdown list now previews the effect in the full image viewer.
DxO Requirements and Startup
PhotoLab runs on Microsoft Windows 10 version 20H2 or Windows 11 (64-bit) and macOS macOS 12.6.8 (Monterey) or later. The program takes up about 1GB, which isn't outrageous when you consider that Lightroom Classic is about 2GB.
At the time of installation, you can choose to install the DxO software as a plug-in for Lightroom Classic (the newer version of Lightroom doesn't support plug-ins). On the first run, you see a welcome panel called the Hub that informs you about what's new in the program, points you to help, and can take you to the online DxO store.
The DxO PhotoLab Interface
 (Credit: DxO/PCMag)
The dark gray interface of PhotoLab has a clean and subdued look. It has two modes: PhotoLibrary and Customize. The latter is where you do all your editing and tuning. That's really all you need, but Adobe's Lightroom Classic offers more flexibility with modes for sharing, printing, maps, and books as well. DxO makes Lightroom round-tripping an option in PhotoLab as well as in PureRAW, DxO's more limited application that just does noise removal and lens distortion corrections.
I like DxO's top button-bar options—one click for full image-size viewing, fit on-screen view, full-screen view, and side-by-side comparison views. Compare shows you what your photo looks like without DxO's corrections, though regrettably, there's no way to compare two different shots side-by-side, as you can in Lightroom. The software automatically applies the fixes as soon as you load a photo. You choose between Standard, Optical Corrections, and No Corrections, with a sample image showing the result of each choice. The Standard option adjusts tonality and noise as well as lens optics, while the Optical option only adjusts the lens issues, leaving the rest up to you.
 (Credit: DxO/PCMag)
In Customize mode, you see buttons for cropping, forcing parallel lines, and a neutral color picker. Across the bottom of the program window is a filmstrip view of the images you're currently working with. Subtle icons indicate whether the photo has been processed, whether camera and lens modules are installed for the image, and a star rating. You don't get similarly helpful clues in Adobe Lightroom, though you do in Lightroom Classic. Each time you open a folder containing images, the program detects the camera and lens used for the photos therein, and it prompts you to download a module for the combination so PhotoLab can optimize the image based on the equipment.
You can search for adjustment tools, limiting results to your favorites (those you’ve marked with a star) or those you’ve already used. Something I miss in the interface is a simple image-rotation button, though you can rotate photos via a right-click menu or keyboard shortcut. There’s also no mouse wheel functionality for scrolling sliders. I do like that double-clicking on a slider sets it back to the default value, however.
A History panel like the one long present in Photoshop lets you step back to any point in your edits. It goes even further, showing you the actual setting number you chose. Along with the history panel and Ctrl-Z for undo, there is a persistent Reset button. The program makes good use of keyboard shortcuts, such as Ctrl-J for creating a virtual copy of your photo. I also like how the mouse wheel zooms you in and out without requiring you to use a key combo. In Lightroom, doing this is surprisingly awkward.
The interface is also customizable in other ways. You can adjust the interface border color from the default dark gray to anywhere from full white to full black. The full-screen view, which you summon with F12 or a button in the top toolbar, lets you browse through images with the arrow keys and use hidable, discreet rating and EXIF panels. You can also detach the image browser for full viewing on a second screen, keeping all controls on the first screen.
Organizing With PhotoLibrary
PhotoLab has made some progress with organization in the PhotoLibrary mode, though it still falls short of Lightroom Classic in this area. On the plus side, it doesn't require you to go through an importing process before you can start editing a photo, as Lightroom does. PhotoLab indexes folders containing photos to let you search by shot settings. That means you can enter a date, focal length, f-stop, and even ISO setting. It's possible to combine any of these in a search. You can now also search based on the lens you used, which is helpful when you're looking for, for example, wildlife photos versus landscapes. Lightroom lets you search by all the equipment and settings metadata as well as by AI-detected people and objects.
 (Credit: DxO/PCMag)
PhotoLab doesn't have an import function at all. You just add folders to the PhotoLibrary, and it creates metadata for images in those folders. This means you can't view photos from a specific import session, something I find useful. Apple Photos, both Lightroom versions, and Cyberlink PhotoDirector all let you do this. Another thing those apps support, but DxO doesn’t, is the HEIF/HEIC file format that many current smartphones use to save storage space while maintaining high image quality. Nor does it support editing the newer HDR file formats like AVIF and JXL; those aren't yet mainstream. Many newer smartphones can shoot in raw, however, often in DNG format, which DxO supports, and apps like Adobe Lightroom Mobile, VSCO, Halide, and ProCam also let you shoot to raw on your smartphone.
You get star ratings and Pick and Reject buttons for organizing your photos. In the Customize view's Metadata panel, you can also use keyword tags and apply them to multiple selected images. The program now lets you edit metadata in the EXIF and IPTC sections.
Keywords show up in the pop-ups that appear when you hover the cursor over a thumbnail. When you go to add a keyword to another photo, recently used ones are available. Here, you can create keyword sets, as you can in Lightroom and PhotoDirector. But you don't get suggested keywords and prefab sets for common uses such as Wedding Photography.
Forget about using geotagged maps and face recognition—DxO doesn't offer them. If those things are important to you, you're better off using DxO PhotoLab as a plug-in for Lightroom Classic, a perfectly viable setup. The program does let you organize photos into Projects, however, in which you bring together pictures you want to work with as a group from various sources.
Image Corrections in DxO PhotoLab
DxO is different from most photo software in that it starts out with its best-guess correction for your photo based on the lens, camera, and exposure settings. DxO Labs takes thousands of photos on test patterns at different lighting conditions to create lens and camera profiles to tune these corrections. The profiles include DSLR and mirrorless camera body and lens combinations, as well as some smartphone cameras.
The auto correction is far better than what you see in most photo software, and it's often all you need. I did find that Phase One's Capture One software does a slightly better job of rendering raw camera files than PhotoLab. However, DxO presents several options in addition to the standard DxO auto correction, including neutral colors, black and white, portraits, and landscapes. You can also dig down into other presets like HDR (high dynamic range) and Atmospheres, the latter of which produces some effective colorizations.
 (Credit: DxO/PCMag)
PhotoLab supports DCP color profiles, which are newer than the previously supported ICC profiles. Adobe uses the same ones. So, if your workflow involves using Lightroom or Photoshop, this option produces the same color rendering. Third-party utilities like those from X-Rite let you create custom profiles with a color target board. Below, you can see where to apply a DCP color profile to your image.
On the shooting side of color management, PhotoLab now lets you calibrate your camera's colors with color checker charts from Calibrite and Datacolor.
Black-and-White Conversion
 (Credit: DxO/PCMag)
DxO's dedicated B&W panel offers film or generic rendering options: three film choices (Fuji Neopan Acros 100—my favorite, Ilford Delta 400, and Kodak Tri-X 400) and four generic rendering choices (faded, balanced, strong, and neutral). You can also use the color Channel Mixer to adjust the output of each color in the black-and-white image.
Wide Gamut Color Space
DxO's Wide Gamut Color Space goes beyond the Adobe RGB color space. With displays that now support HDR and P3 color spaces, you get more of the spectrum. It's mostly a subtle difference from the standard color space when viewed on my Lenovo ThinkVision 4K monitor, but it's noticeable on saturated shots of flowers. This works only with Raw files. DxO claims that Wide Gamut enables ClearView (see below) to squeeze even more rich color detail from your shots, and it did give a slightly more lifelike look to some test shots. DxO, however, doesn't include HDR-specific editing features, such as an extended histogram, that are making their way into competing products like Lightroom, and Zoner Photo Studio.
Auto Correction and Customizing
If the auto correction doesn't quite hit the mark, the program's Customize mode lets you change exposure compensation, contrast, colors, detail, and more. In addition to the standard exposure slider, you can use DxO's Smart Lighting slider, which can brighten shadowy areas without punching out whites. Cranking it all the way up creates a decent single-shot HDR effect, but for more drastic HDR effects, check out CyberLink PhotoDirector. Preset choices include Slight, Medium, and Strong; choose Custom to adjust the slider to taste. I appreciate that double-clicking on a slider resets it.
Under the standard Contrast slider, the Microcontrast tool can add serious sharpness to images while avoiding edge distortion. A magic wand button automatically sets the microcontrast for the current image. In my tests, its results were impressive in sharpening photos, though it's not something you should use for face shots or noisy images.
Lens Softness Compensation
Speaking of sharpness, DxO's Lens Softness Compensation tool impresses. The company improves it for version 8. Based on particular lens profiles for the equipment used, the tool can noticeably improve the detail in your shots. The Unsharp Mask tool offers a more traditional type of sharpening. Here's the previous version's Lens Softness Compensation tool:
 (Credit: DxO/PCMag)
And here's the new one in version 8 in action, which is remarkable:
 (Credit: DxO/PCMag)
Smart Lighting uses face detection and spot-weighted correction. This kind of face detection isn't for organizing and retrieving images with faces but just for lighting correction. The tool can bring a face out of obscurity in cases where there's a bright background. It does an even better job than the Shadows tool, which tends to wash out images. Lightroom lets you get about the same result with some tweaking, and DxO's tool doesn't find faces in profile. No worries. You can select the face or any other object to meter on manually. It works the way spot metering in a camera does but lets you apply it after the shot.
DxO PhotoLab's red-eye tool works completely automatically and nearly perfectly if the red areas are clearly delineated and the faces are not obscured.
Tone Curves
New for version 8 of PhotoLab is a unique Luma option in its Tone Curve tool. This lets you adjust light and dark areas of an image selectively without affecting color saturation. You can see that the colors of the below image composite are more juiced up on the left (where I used RGB curves) than on the right (where I used the Luma option).
 (Credit: DxO/PCMag)
With Lightroom's Tone Curve tool, I could only get a result similar to the left side above, with even more amped-up color saturation.
 (Credit: Adobe/PCMag)
DxO DeepPrime Noise Reduction
Probabilistic Raw Image Enhancement (Prime) is a raw-file noise-reduction tool in PhotoLab that the company claims will add an extra stop of exposure to your digital photos. Most noise correction just compares nearby pixels to determine which represent noise, but DxO examines a much larger area to make this determination, which should remove more noise while leaving more detail. DeepPrime performs its work at the same time the image in demosaiced from the raw camera file. DxO claims that the latest version of the tool, called DeepPrime XD2s, provides "unprecedented levels of noise reduction and detail extraction."
A newer level, called DeepPrime, uses machine-learning AI to get even cleaner results in a shorter time. Yet a third level, called DeepPrime XD, is for extra detail. Prime only works on raw camera images, and these tools are available only in the more expensive Elite edition of the program. If you shoot in low light or at higher ISO, you can squeeze sharpness and detail out of your shots. The deal with Prime is that it lets the program take as long as it needs to analyze and correct digital noise. The tools are now faster than at first launch, even the newest XD version.
Here's a sample noisy shot before any noise reduction:
 (Credit: PCMag)
And here's the same shot after applying competitor Topaz DeNoise AI (left), the original noisy image in the middle, and DeepPrime XD2s (right):
 (Credit: PCMag/Topaz Labs/DxO)
As you can see, the corrected images show great improvement to the original, though Topaz and DxO use different color saturation. Topaz retains more detail, most noticeably in the cheek, but DxO includes a Force Details slider.
 (Credit: DxO/PCMag)
When you choose one of the Prime settings, you can now see the results in a good-size loupe window. You can set this from 100% to 1600%, though I wish it just used the same magnification as the main image view. The only way to apply Prime to a whole image is to export it. This previously took over a minute, but with subsequent program updates, DeepPrime XD2s took just 20 seconds on the Canon 80D raw file on my test PC. In other words, getting this high level of noise reduction doesn't interrupt your photo editing workflow too much.
Once you press Export for a photo for which you selected Prime noise reduction, you see an icon in the photo's thumbnail that it's being processed and a tiny progress bar that you can click to enlarge and view a countdown timer.
The left image in the example below shows how Prime processing impressively removed the noise on the dark gray bench. It basically took an unusable mess and made it clear and natural—and that's just with the standard Prime level.
 (Credit: DxO/PCMag)
If you need only this noise reduction and DxO's lens-profile-based corrections for geometry, sharpness, chromatic aberration, and vignetting, you can get it in the highly recommended DxO PureRAW, which also includes the lens corrections, but not the entire photo editing feature set of PhotoLab. It's very simple to use.
ClearView Plus
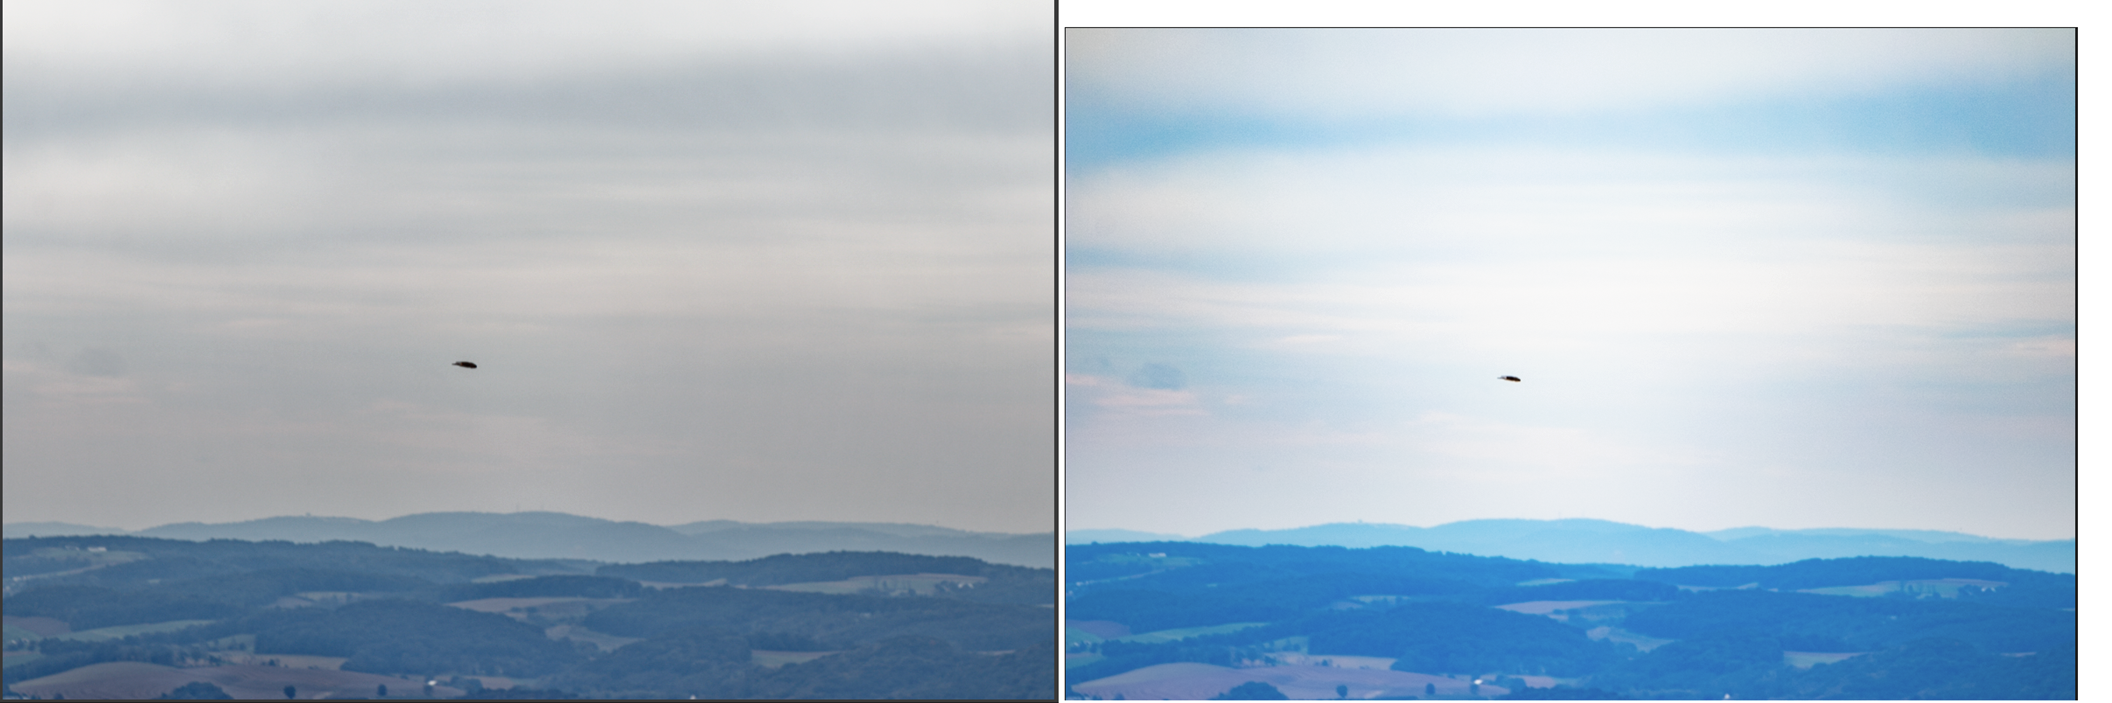
ClearView can effectively remove the haze from a landscape shot. The feature saves you from having to create masks for different areas of an image to adjust them independently. It determines distance in the photo and adjusts the black level accordingly. In my test landscapes, ClearView, which is completely automatic (though you can adjust its intensity), did a bang-up job of retrieving detail from distant regions in the photos. I was unable, in testing, to achieve as good a result by adjusting black and highlight levels using the standard tools.
 (Credit: DxO/PCMag)
The sample image above shows a hazy original photo detail on the left, DxO PhotoLab's ClearView Plus applied in the middle, and Adobe Lightroom's Dehaze on the right. Note that these results are only using the respective haze-removal tools. You can get a better image in both programs by applying other adjustments on top of the autocorrection. But it does show the natural detail that DxO's software can restore. Another example below, with DxO on the left and Lightroom on the right, shows the Adobe Dehaze tool applying a strong blue color cast, while DxO ClearView Plus leaves the colors more natural.
 (Credit: Adobe/DxO/PCMag)
LUTs
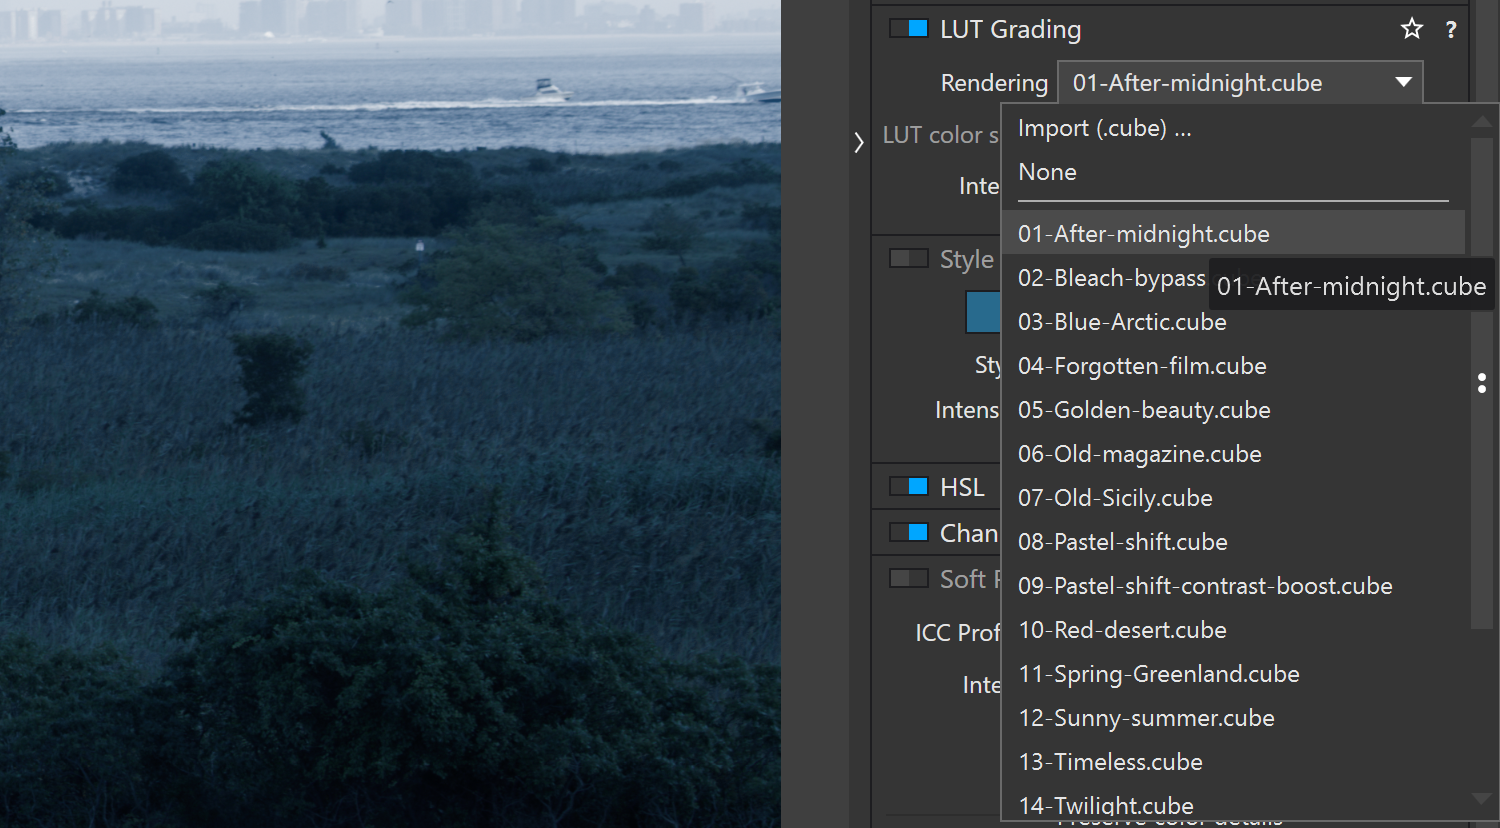
PhotoLab includes color LUT (lookup table, also called CLUTs for color lookup table) support. These are color filters standard in the video production industry. They correct for particular video camera models but also to create moods and effects. For example, a common type of LUT changes a scene shot in the daytime to look like it was shot at night. Other photo applications, such as CyberLink PhotoDirector, have been adding LUT support in recent years, so it's not a surprise to see it in DxO's program. PhotoLab now comes with 17 standard and 15 premium LUT presets, and you can import any you find that use the .cube extension.
 (Credit: DxO/PCMag)
Local Adjustments With DxO
Since its acquisition of Nik Software, DxO's software includes a Brush and other tools for making local adjustments, several of them thanks to the U Point tool. In Customize mode, the Local Adjustments button sits all the way on the right side and gives you access to several tools: Control Point, Control Line, Graduated Filter (for gradients), DxO FilmPack (active if you own that separate app), Auto Mask, Brush, and Eraser. You can adjust the brush's width and feathering, as well as add multiple selections with the different tools.
PhotoLab no longer uses the clever on-image Equalizer control; instead, a more standard right-side panel shows the sliders for adjusting Exposure, Contrast, Microcontrast, Clearview (see next section), Vibrancy, Saturation, Temperature, Tint, Sharpness, and Blur. The last can even add bokeh iris circles if you crank it up enough. Its Feathering, Flow, and Opacity sliders let you control the transition from the effect to the unaffected areas, as well as, obviously, the effect's transparency.
 (Credit: DxO/PCMag)
I miss the innovative Equalizer control, which you can see in the screenshot below, but I suspect people found it hard to use. Here's what it looked like:
 (Credit: DxO/PCMag)
Control Point still applies the correction to all pixels in the selected area of the same color and brightness value as the point. It selects a circular area for its effects, with feathering at the edges. This is where the U-Point technology comes in; it's similar to Lightroom Classic's Range Masking tools for color- and tone-based selection for local adjustments, but while those are separate, U Point combines the color and luminance attributes in one tool. It enables fun and powerful ways to alter images, for example, intensifying a sky or changing a shirt's color. I like how you get a split-screen view in this mode that lets you slide a divider back and forth in the image to show before and after adjustments.
Hue Mask
A new local selection tool in version 8 is the Hue Mask. This lets you select a range of color hues to operate on exclusively. I used it to turn the dead yellow grains in this shot into a charming pink field of flowers. Note how the color changes don't affect the deer.
 (Credit: DxO/PCMag)
Graduated Filter
The Graduated Filter is a typical gradient tool, useful for things like the faux tilt-shift effect or intensifying skies. It lets you adjust the effect area with a line you can grab, extend, or rotate with the mouse cursor. In the image below, you can see the before view on the image with the line applied. The area between the dotted line and the solid line with the control point in the middle is a gradient, and past that line, you get a 100% adjustment strength. Note that you can set how much of the selection is based on light (luma) versus color (chroma) from the panel on the right.
 (Credit: DxO/PCMag)
One of the coolest things about this tool is that you can see adjustments change as you move the selection area around with the control point.
Other Masking Tools
Among other masking tools, the Auto-mask isn't fully automatic like Photoshop's Select Subject. Rather, it gives you a brush with edge detection. It's also somewhat confusing because your rough brush stroke remains on-screen unless you start applying adjustments, which only pertain to the automatically refined mask.
 (Credit: DxO/PCMag)
The panel under Local Adjustments shows you previously applied local adjustment masks. Clicking on an entry takes you to the mask in the image. You can also use the Opacity slider and the Invert option, which looks like two arrows pointing in opposite directions. The panel is a helpful addition for working with local adjustments.
HSL Adjustments With DxO
This version update to PhotoLab adds a color wheel HSL (hue-saturation-luminance) adjustment tool. Upon enabling it, you can change colors without having to select them. There are eight basic colors, and you can change the selected range on the color wheel. I wish that it had an eyedropper tool for selecting a color range on your image, but you can do some nifty color replacements nevertheless with the tools mentioned in the previous section. The HSL tool's Uniformity slider works well on skin tones and ensures that a person's visage looks consistent. I applied HSL Uniformity to the right side for a more consistent appearance.
 (Credit: DxO/PCMag)
One thing missing is layers, but you can actually add multiple masks from a choice in the radial menu. Capture One, in its last update, made a big push with layers of late, letting you see, for example, a mask layer. Truth be told, I'm not a huge layer fan. I suspect other photographers are like me in this regard, but there are certainly times when you may want to see or disable a layer, particularly if you're working with multiple masks.
DxO ReTouch Tool
The ReTouch tool takes over for the Repair tool. Like its predecessor, ReTouch lets you either repair or clone a selected object. You can transform and resize the source material to taste.
 (Credit: DxO/PCMag)
The tool lets you select the source area and has two modes: Clone and Repair. The blue overlay area shows where an eliminated person was before the fix. I can move the source area to perfectly line up the streaks in the snow.
Geometry Correction With DxO
Another DxO product, ViewPoint, tackles a rather intractable issue of photography: volume anamorphism, where objects like human heads become distorted when they're at the edge of a wide-angle image. PhotoLab does camera and lens-profile based geometry correction for barrel, fisheye, and pincushion distortion automatically, also letting you fine-tune. As of version 6, you can also rework your photos' skewed geometry using guides, with a choice of two or four lines you position to realign your photo contents.
 (Credit: DxO/PCMag)
PhotoLab's always-present top toolbar handles cropping well, but I wish it remembered your aspect ratio choice: I usually prefer Unconstrained, but the program always switches me back to Preserve aspect ratio. The horizon-leveling tool now has an automatic setting like Lightroom does, which worked well in testing. Finally, the program can correct moiré, vignette, and chromatic aberration. As in previous versions, DxO PhotoLab does a remarkable job of removing chromatic aberration.
DxO Watermarking
 (Credit: DxO/PCMag)
DxO includes a watermarking feature, something of importance to pro photographers who want to spread their brand or simply protect images. The tool lets you use either text or an image as your watermark. You get a good selection of fonts, and you can adjust the opacity, scaling, and color. Unfortunately, you can’t drag the text’s position. You can just choose center, bottom, and so on, along with alignment. Save your watermark as a preset if you plan to use it on more pictures.
DxO Output and Sharing
Once you've perfected your image in PhotoLab, the blue bar at the bottom right lets you output directly to disk, to another photo editor, to Facebook (though only on macOS), to Flickr, or to Lightroom Classic. The Facebook exporter lets you choose a target album, but not privacy level or tagging. The Flickr export has better control, letting you choose an album, add keyword tags, and set privacy. It even pulls in your previously used tags and albums and offers them as selections. The disk export option offers only JPG, TIFF, or DNG.
One sharing option that's lacking is via email. Lightroom Classic lets you quickly send any image on-screen via email by right-clicking. The lightweight Lightroom, however, is more restrictive with export options.
When exporting to disk, you can choose multiple outputs at once. When exporting to Lightroom, I noticed the file size was nearly doubled. On a more basic level, I wish all photo editing programs would simply use the standard Windows share feature, which would ease exporting and sharing in general.
 (Credit: DxO/PCMag)
PhotoLab includes basic printing capabilities, accessible from a permanent button next to the Export button. You can choose a grid size for multiple images, apply sharpening, and add a caption in the font style of your choice. But for more layout options (including savable custom layouts), look to Lightroom Classic. PhotoLab's Color proofing lets you see how your photo will look when printed on a printer for which you've installed the color profile. It's something that Lightroom has offered for years, so it's good to see the feature in PhotoLab for those professionals who need it.
Verdict: Excellent Photo Tools for a One-Time Price
Though it's not a full-featured photo workflow solution, DxO PhotoLab gives you a real edge when it comes to refining images. Its lens and camera-calibrated corrections achieve results that can be hard to accomplish in other software. In particular, its unique DeepPrime XD2s noise reduction, U Point local adjustments, Lens Softness correction, and ClearView Plus tools bring us close to digital photography editing nirvana. It also spares you the necessity of having to import images before you can work on them, as Lightroom requires. As such, DxO PhotoLab is an Editors' Choice award winner, along with Adobe Lightroom, Lightroom Classic, and Photoshop.