

Microsoft Windows has long had numerous options for taking screenshots, also known as screencaps or screen grabs—perhaps too many. Windows 11 simplifies the situation. Recent updates to the OS have added nifty new tools that let you take screenshots more easily, record video of your screen activity, and run optical character recognition (OCR) on images. Here are seven ways to take a screenshot in Windows 11.
1. Press PrtScn (Print Screen Key) and Paste
 (Credit: PCMag)
Press the Print Screen key (PrtScn), and an image of the entire screen copies to the clipboard. You then must paste the image into an app such as Microsoft Paint or Adobe Photoshop, either by pressing Ctrl-V or choosing Paste from a menu or right-click option.
An advantage of this method (and the next) is that it doesn't affect the app displaying on your screen the way using a keyboard-combination shortcut sometimes does. Sometimes a menu dropdown disappears if you use a shortcut instead.
If you want to capture only the active window and not the full desktop image, add the Alt key for Alt-PrtScn. Using this keyboard shortcut saves the current window to the clipboard, and from there, you can paste it into an imaging application. In Windows 11, the result can be a little strange because the rounded window corners are extended to squared-off corners (image files are always rectangular).
Note that a Windows update changed the behavior of the Print Screen key: It now opens the Snipping Tool by default. To get back to the behavior described above, go to Settings > Accessibility > Keyboard and switch off the setting "Use the Print screen key to open screen capture."
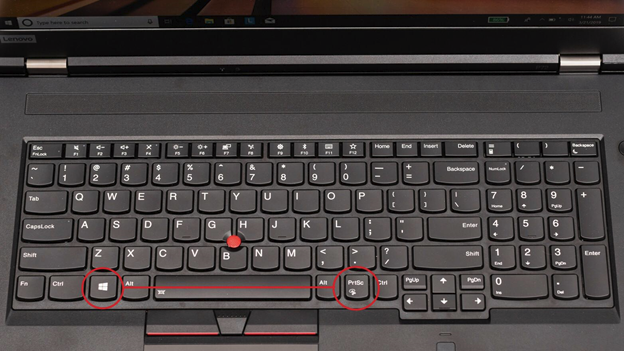
2. Set Up PrtScn to Automatically Save to OneDrive
 (Credit: Microsoft/PCMag)
Combined with OneDrive, the Print Screen (PrtSc) key can automatically create an image file of your screenshot. I include this method separately from the standard PrtScn option because the result is so different and saves you the extra steps of opening an app, pasting from the clipboard, and saving an image file.
To use this method, click OneDrive’s cloud icon on the right side of the taskbar. Choose Settings and then the Backup tab of the dialog box and check 'Save Screenshots I capture to OneDrive.' That one simple check box changes everything about PrtScn. When you tap the key, an image file in PNG format is automatically created in the OneDrive/username/Pictures/Screenshots folder. The filename uses the current date and time.
Right after you take the screenshot, a notification appears in the lower right corner of the screen; clicking on this takes you directly to the folder with the file highlighted. You can then access it from any device with OneDrive (there are clients for every major platform, as well as a web version). This applies to any screenshot you snap on any PC (or even on a Mac!) signed into the same OneDrive account (i.e., your Microsoft account). It's handy when I don't have time to save an image file in a separate step, such as during a live presentation.
3. Press Windows Key-PrtScn
 (Credit: PCMag)
Here's yet another way to use the PrtScn key: Use the keyboard shortcut Windows Key-PrtScn.
Use this option if you want to take screenshots and automatically save them to the local drive. This method causes the screen to dim briefly and places a PNG file in the Pictures > Screenshots folder by default. (Note the different placement of the PrtScn key on the keyboard in the image above.) You can also paste the image anywhere right after using this method since it's also copied to the clipboard.
4. Use Windows Key-Shift-S and the Snipping Tool
 (Credit: Microsoft/PCMag)
Windows 11 combines functionality from Windows 10’s terrific Snip & Sketch tool and rolls it into the newer Snipping Tool. It also adds the ability to record videos of action on the screen.
The easiest way to get to the Snipping Tool is to press Windows Key-Shift-S. That keyboard shortcut gives you a choice to take a screenshot using a rectangular snip, freehand selection, window, or full-screen capture (that’s the order of the icons you choose from in the image above). If you change your mind after you press Windows Key-Shift-S and don’t want to take a screenshot, use the Esc key to back out. If you have a Surface Pen stylus, double-tapping its eraser button opens the Snipping Tool.
For the first and last options, draw with the cursor to select the area you want to capture. For the window option, just click over the target window; the full-screen capture happens as soon as you click on that last button.
 (Credit: Microsoft/PCMag)
Once you release the cursor, you see a notification in the lower right with a thumbnail image of the screenshot. You can ignore it if you plan to paste the screenshot into another app because the image is already saved to the clipboard and to your Pictures folder. Or you can click the thumbnail to open the Snipping Tool interface (shown below). Here, you can mark up the screenshot with a pen or highlighter, crop the image, or use a ruler to draw straight lines.
 (Credit: Microsoft/PCMag)
You can set the screenshots to save immediately to your Pictures > Screenshots folder. If you don't want to take up the disk space, you can change it in the Snipping Tool's Settings, accessible from the app's three-dot menu at the top right.
 (Credit: Microsoft/PCMag)
You can save the screenshot and any edits using the disk icon (some visual metaphors never die). A Share button lets you send the image using Windows 11's standard Share panel. You can also print the image or open it in another app from the menu options.
One beef I have with this utility’s crop feature is that it doesn’t offer aspect ratio options. I’d like to be able to, for example, choose a 16:9 widescreen size, and I doubt I’m alone in that. As it is now, you have to take the image into Microsoft Paint or some other image-editing program to get this simple capability. I also wish the Snipping Tool gave access to previous screenshots as the OneDrive option above and the SnagIt option below do.
If you want to use a delay timer before taking a screenshot, simply type Snipping in the Start menu and open the program window rather than using the keyboard shortcut. In the small menu bar that appears, look for the clock icon and choose to add a delay of 3, 5, or 10 seconds before you take a screenshot.
The Snipping Tool now offers optical character recognition (OCR) technology, meaning it identifies any words that appear in an image are makes them searchable. The OCR tool can copy text found in an image and automatically redact info like names, email addresses, and phone numbers. You get to the tool from the text-page icon, shown below.
 (Credit: Microsoft/PCMag)
The Snipping Tool in Windows 11 can also record video of your screen. To record your screen, you choose the movie camera icon in the toolbar that appears when you tap Windows Key-Shift-S. You then select an area of the screen to record with the crosshairs cursor that appears. Next, you click Start, wait for a 3-2-1 countdown to finish, and then do your thing on the screen. When you're finished, press Stop. Once you stop, you see a playback of the video, and you can save or share it just as with a still screenshot. An additional option is to edit it in Clipchamp, which, though not our favorite video editor, is adequate for quick trims and splits. Any sound playing from your PC is included in the recorded clip.
 (Credit: Microsoft/PCMag)
Finally, if you enable Clipboard History, you see your last few screenshots available for pasting when you hit Windows Key-V. That actually works with any of the screenshot methods discussed here.
5. Install a Third-Party Screenshot Utility
For many years, I was a devout SnagIt user, particularly because I liked how it saved any screenshots I took for use later. It’s still an Editors’ Choice winner for screenshot utilities and you can certainly use it, but I now find that the built-in Windows screenshot tools serve my needs adequately.
SnagIt and most other third-party utilities let you take scrolling screenshots, which are images that have automatically scrolled down to capture parts of the window that are below the visible area. The most common use for a scrolling screenshot is for a web page. Windows 11's native screenshot methods can't do it—but Microsoft Edge and Firefox can. In Edge, right-click on the webpage, select Web Capture, and choose Capture Full Page.
Google Chrome can take scrolling screenshots, too, but you have to change a Developer Setting to get it. It's easier to install an extension like Scrnli (though I'm not a fan of extensions since they usually have access to all your web browsing activity).
6. Select Capture Window From the Game Bar
 (Credit: Microsoft/PCMag)
Windows Key-G opens the Game Bar. From there, if you go to the Capture window, you see a camera icon. Tap it, and your screenshot is saved, somewhat counterintuitively, to the Videos/Captures folder under your main user folder. You can change the target folder in the main Windows Settings app. Alternatively, you can press Windows Key-Alt-PrtScn to bypass opening the Game Bar. This tool also lets you record screen activity and places the resulting video files into that same folder.
7. Press Volume Up and Power Buttons on Surface Tablets
 (Credit: PCMag)
Taking screenshots on Surface tablets is different from doing it on a Windows PC unless you have a keyboard attached. The on-screen touch keyboard has no PrtScn key. As mentioned, if you have a Surface Pen, you can simply double-tap its back button to open the Snipping Tool.
On the Surface Pros back through the Surface Pro 4, press the volume up and power buttons at the same time to take a screenshot. Be careful to press the buttons simultaneously, or else you end up turning off the screen.
The result of shooting this way is the same as pressing Windows Key-PrtScn; an image is saved to your Pictures > Screenshots folder.
Older Surface tablets used the Fn-Windows Key-Spacebar combination on their attached keyboards, and some had you press the power button and a hardware Windows button simultaneously. You might have to experiment or dig into documentation if you have a less popular tablet model.
How to Take a Screenshot on Any Device
There's a good chance that you may need to take screenshots on your smartphone and other devices as well as on a Windows 11 PC. For those instances, head over to our story on how to take a screenshot on any device, which walks you through the process for all of your non-PC gadgets.